Hi! Ruth here with a more in-depth look at the tutorial included in your Lucky Dip Club Cacti Cosy Crochet kit! I tried to make the instructions as clear as I could but understand that any crochet newbies may benefit from some bigger images and a few hints and tips to get you started - lets go!
*Your finished cosy should measure around 20cm in circumference - it will fit around a small cup/glass or pot, with a little stretch to go around a larger pot if you have one, at the end of this tutorial I will suggest ways of making it bigger if you have a specific pot in mind!*
Step 1: The Chain Stitch (ch)
All crochet work starts with a chain of stitches which acts as a foundation row for whats to follow. This cosy tutorial uses 35 chain stitches but a large blanket will use around 150 chains as its foundation (yikes!). As you make this initial chain it will start to twist - you can hold it to keep it straight as you go.
+ TIP + Keep your stitches loose on the hook, this will make it easier as you go to the next stage. Its a very common beginners trait to crochet too tightly so chillax and keep everything fluid and loose (this can take a little practice!)

Make a slip knot place over your hook. Pull the ends so its gently tightened around the hook - not too tight as you need to pull yarn through this loop next!

With your slip knot loop on the hook, wrap your yarn that comes from the skein over the end of the hook. You can gently hold the knot end with your finger and thumb.

Pull the hook towards you sliding the loop to the top of the hook and then pull the wrapped over yarn through the loop on the hook.

You will be left with one loop on the hook again and one chain stitch - these get easier to see when you have a few more.

Repeat the process - yarn over, pull through loop - making chain stitches until you have around 35 in a long row. This is your foundation chain - keep counting and chaining!
Step 2: The Slip Stitch (sl st)
A slip stitch joins crochet work together without making any additional stitches. We will use one to join the ends of our foundation chain together to make one continuous loop that forms the basis of the cosy.

Leaving your last chain on the hook take the start of the chain and put the hook through the first chain - giving you 2 loops on the hook. Make sure that the chain is not to twisted.

With your 2 loops on the hook wrap the yarn over and pull it though both the 2 loops.

This will leave you with one loop on the hook, a continuous foundations - and you are ready to start the next stitch! You may want to gently pull this loop so its not too loose.
Step 3: Double Crochet Stitch (dc)
The Double Crochet Stitch is a super easy basic stitch which is frequently used and a great place to start. It creates a nice surface area. Keep practising and don't make your stitches too tight and it will all happen!

Make one chain stitch (yarn over, pull through loop on hook) and then put the hook though the 2nd chain of your circle foundation chain. This is how we start making the cosy grow upwards!

With your hook through the 2nd loop of the foundation chain wrap the yarn over the pull through the chain stitch...

... this will leave two loops on your hook.

Wrap the yarn over again and pull through both loops leaving one loop on your hook. You are repeating the 'yarn over, pull through' process twice, a good thing to remember as its a 'double crochet'!

This shows a complete first round of double crochet stitches. You can use a slip stitch again to join this row of Double crochet together as you did for the foundation chain. As you add more rows the crochet will start to appear more obvious. Keep going to that next row!
Use the tail of your yarn as a marker for the central back point. When you have done a complete row of double crochets this will act as the start and end point.

The next row of double crochets stitches aren't made into a chain as the first, these are made into the 'v' shape made up of two loops that have been created by the previous row. We want to put the hook under both the loops of the 'v' shape not just one of them.

So, hook through, yarn over and pull through under the 'v' shape stitch...

...leaving 2 loops on the hook.

Yarn over and pull through both the loops on hook - making a double crochet stitch. Repeat a double crochet stitch under each of the 'v' shape stitches. Continue doing double crochets all the way round. I have designed this so that we don't need to step up on the rows, they are in a continuous loop. Keep going round until you have about 7 rows, finishing at the back where your yarn tail is!
*if you come to the end of your first skien of yarn just tightly tie the new one to the first. You can sew the loose ends into your crochet with your needle at the end or trim them off*
To Finish/Tie off: When you are finished keep a loop on the hook. Cut your yarn with a 10cm tail and then pull the loose end back through the loop on the hook. Pull to tighten and sew the end in!
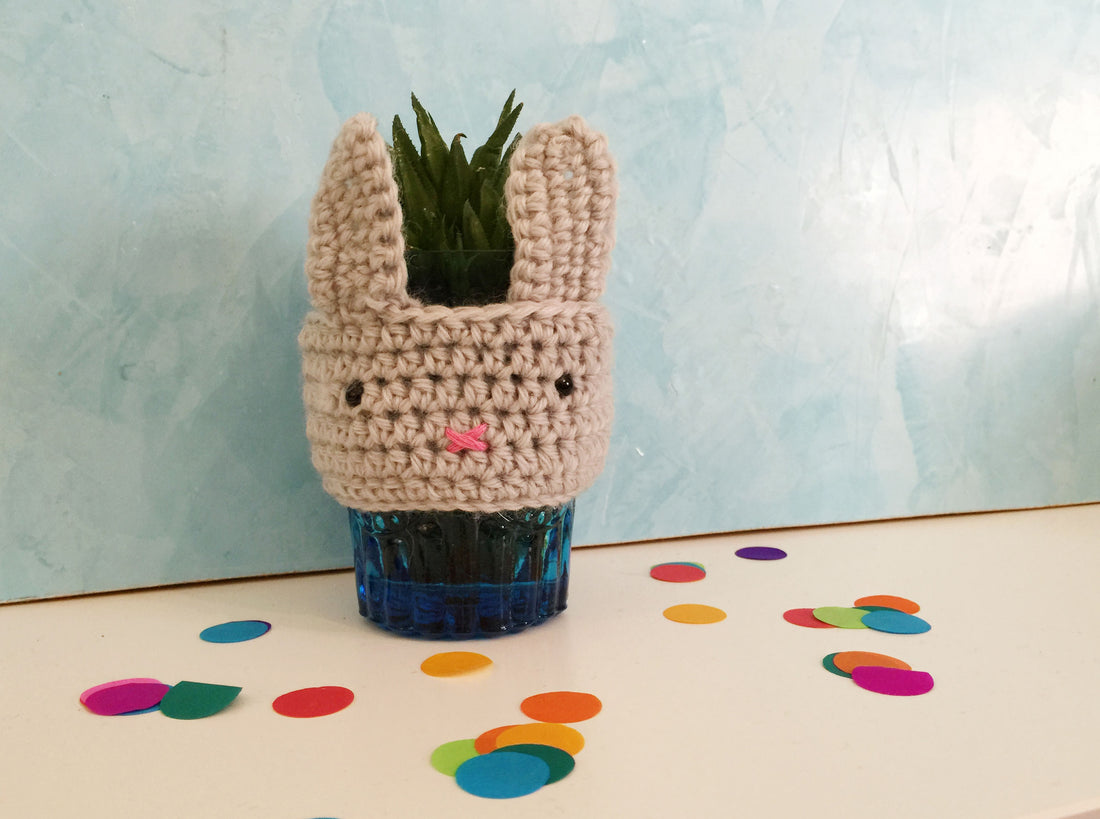
Step 4: The Ears!
This is a simple method to make some very cute shaped ears. It uses the chain and double crochet stitch (you should be a pro by now!) and involves a bit of back and forth but once you get the knack of working into a foundation chain it'll be a no brainer!

1. Make a chain of 6 and add one additional stitch to 'turn'. We add this stitch as we are going to work back into the chain. Do a double crochet stitch into each chain, starting at the 2nd chain from the hook. You will be turning your chain on its side and working from right to left.

When you have done a double crochet down one side of the chain do 3 double crochet stitches into the end of the chain (which is where your yarn tail will be), Making these 3 (dc) stitches into the end will mean that you create a curve at the top. You can then do a double crochet into the other side of the chain.
One row of double crochets!

2. With one row of double crochets complete we will do another to make the ear a thicker shape.
Make one chain (yarn over, pull through loop!) to turn, and working from left to right this time do a double crochet putting the hook under every 'v' up one side, at the top do 3 Double crochets into the centre top and then work back down the other side. This will create a lovely ear! Repeat again for ear number two - you may find this one easier!

Fasten off by cutting the yarn with a 10cm end and pulling it back through the loop on the hook.
Step 5: Attaching the ears!

Thread some of your yarn on the needle with a knot on the end and place an ear just behind the top edge at the front of the cosy. Use a neat stitch (running stitch is fine!) and work from one side to the other. As the yarn is the same colour it will be almost invisible! Repeat for both ears.
Step 6: Adding the details
Thread your needle with the pink thread, knot the end (you may need a double knot) and sew a little cross shape for the mouth. Position it between the ears!
The eyes are made using the black 'brads'. These are like split pins - push through the crochet from the front and push out the pins to hold to secure!

Hope this tutorial helped you achieve some crochet kudos. Persevere, practise and don't be afraid to unpick to get it right. Bring it on!
HINTS AND TIPS!
If your hands are aching after a few stitches you are holding the yarn too tight! The yarn coming from the skein should be kept very loose, and gently pull the yarn through to decrease any tension.
If you have created your foundation chain of 35 and your cosy still looks very small you may need to loosen your stitches.
If you would like to make a bigger or smaller cosy (for a planter or egg cup perhaps?!) just decrease or increase the foundation chain accordingly. You can make the chain and then wrap it around your chosen vessel to check its going to have the right circumference. Add more chains or take away to get the right length and then continue the process as per these instructions.
Is your cosy getting smaller? Yikes! As you have made 35 chains in your foundation row you will then do 35 double crochets in the next row. Each time you hit the point at the back where the yarn end is you should have done another 35 double crochet stitches. As long as you are working a crochet stitch under both the loops of the 'v' shape of the previous row you should be on the right track!
Count your rows, this is a little annoying but it will help you get a good finish and on more complex projects it will make things go to plan!
Don't be afraid to unravel or even do something a bit different if that works for you - no one will call the crochet police!
Gather more info. This is what YouTube is for! I am sure I'm not the only one who watches vids of other people making stuff, I can get lost for a while 'researching' new techniques! My local library has a great craft section - well worth checking out if you want to experiment more on your crochet odyssey!
Take a break. If you are getting frustrated pop the kettle on and come back to it. You won't do your best crafting if you are cross!
Happy Making! x